Author Yifan Jiang, Phd. JH Technologies, Applications Scientist
Technical Overview: Sample Preparation of Ti-6Al-4V Alloy for EBSD Analysis
Titanium Alloy
Introduction
Titanium and its alloys are widely used in energy, medical, aerospace, and automotive applications due to their high strength-to-weight ratio, corrosion resistance, and biocompatibility. Mechanical performance and functional properties of titanium alloys are strongly influenced by microstructure, which in turn is affected by alloy composition, heat treatment, and manufacturing processes.
Electron Backscatter Diffraction (EBSD) is a powerful technique for characterizing crystallographic orientation, phase distribution, and grain structure in titanium alloys. However, EBSD analysis of titanium is particularly sensitive to surface condition due to the material’s relatively low hardness and tendency to retain deformation from mechanical preparation.
This application note presents a practical and repeatable sample preparation workflow for EBSD analysis of a commercial Ti-6Al-4V alloy. The effects of individual preparation steps on surface finish, morphology, and EBSD data quality are discussed.
Material and Experimental Procedure
The material examined in this study is a commercial Ti-6Al-4V (Ti-6-4) alloy, consisting primarily of the α phase with a minor β phase fraction. Sample preparation followed a conventional metallographic sequence including mounting, grinding, polishing, and final vibratory polishing.
Table 1 summarizes the recommended preparation workflow used in this study.
Table 1: Sample Preparation Procedure for Ti-6Al-4V Alloy
Step | Equipment | Materials / Accessories | Duration |
Compression Mounting (Hot Mount) | EpoMet or TransOptic Compound | ~20 min | |
Epoxy Mounting (Cold Mount, optional) | EpoxiCure 2 Epoxy | 8–12 hrs | |
Grinding | 240, 400, 600, 800, 1200 grit | ~3 min / step | |
Polishing | 9 µm MetaDi Diamond | 2–3 min | |
3 µm MetaDi Diamond | 3–5 min | ||
1 µm Alumina | 3–5 min | ||
MasterMet 2 + 20 vol% H₂O₂ | ~15 min | ||
Vibratory Polishing | MasterMet 2 + 20 vol% H₂O₂ | ~60 min |
Results
Surface Condition Prior to Grinding and Polishing
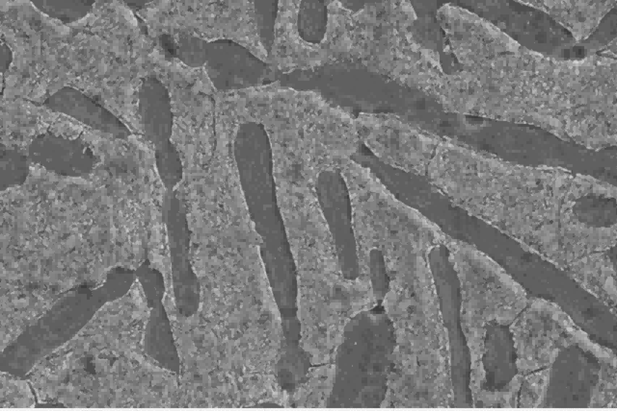
Figure 1 shows the surface condition of the Ti-6-4 sample prior to grinding and polishing. The surface exhibits deep mechanical scratches and significant deformation. No grain structure or phase contrast is observable, making the surface unsuitable for EBSD analysis.

Figure 1: SE image of Ti-6-4 surface prior to grinding and polishing. Deep scratches dominate the surface (images taken on Coxem CX300 SEM)
Surface Condition After Grinding and Polishing
After completion of grinding and mechanical polishing steps (prior to vibratory polishing), both secondary electron (SE) and backscattered electron (BSE) imaging reveal visible grains and phase contrast between α and β regions (Figure 2).
Despite the improved surface quality, small surface defects and residual deformation are observed within grains. EBSD analysis performed at this stage resulted in a hit rate below 98%. However, small surface defects are observed within the grains. Additional process improvement can be done to generate better results.

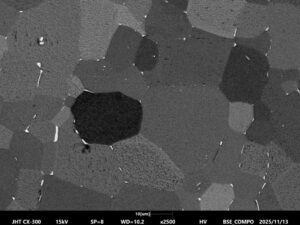
Figure 2: SE and BSE images after grinding and polishing. Grain structure and α/β phases are visible, but surface defects remain, limiting EBSD performance (images taken on Coxem CX300 SEM)
Surface Condition After Vibratory Polishing
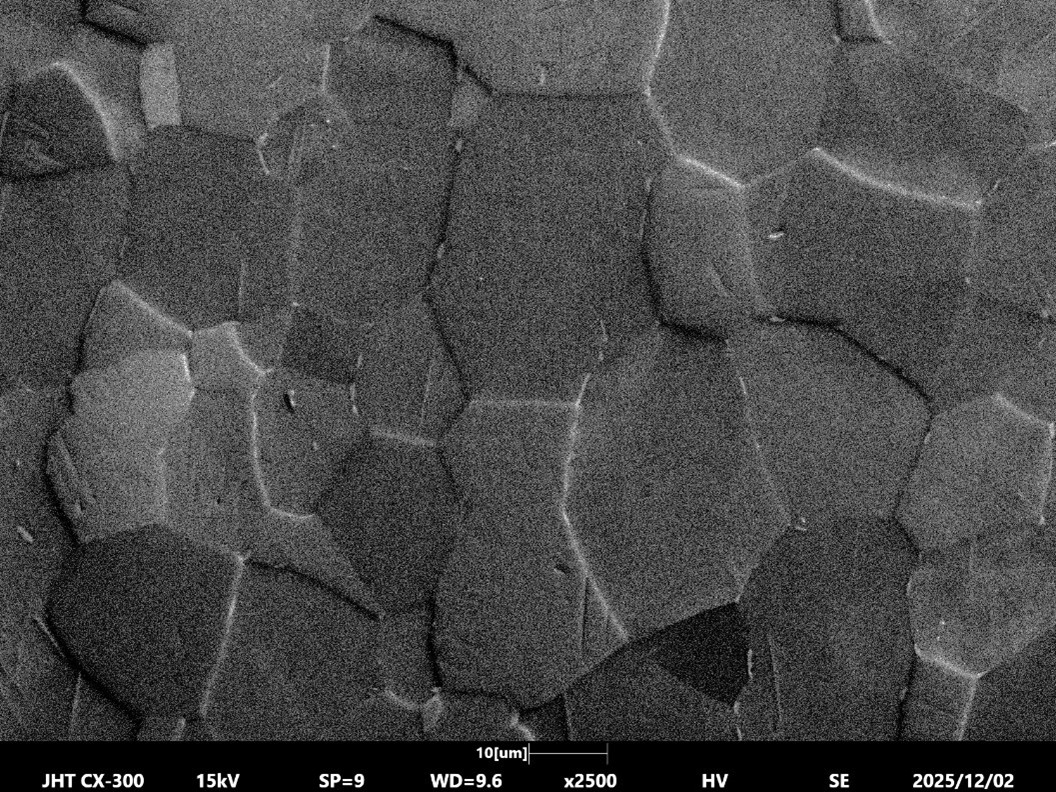
Figure 3 shows the surface after vibratory polishing using colloidal silica with hydrogen peroxide. Grain interiors are smooth and largely free of scratches, and grain boundaries are clearly defined in both SE and BSE images.
With this surface condition, EBSD analysis achieved a hit rate exceeding 99% allowing detailed analysis for crystallographic study.


Figure 3: SE and BSE images after vibratory polishing. Smooth grain interiors and well-defined grain boundaries enable >99% EBSD hit rate (images taken on Coxem CX300 SEM).
Discussion
Besides the proposed sample preparation procedure that we propose above, we also experimented with different sample preparation techniques to confirm our process is optimized.
First subject that we want to discuss is the use of H2O2. Based on a lot of articles, chemical-mechanical polishing is needed for titanium polishing since the material is very soft and can be abraded by polishing media. The use of H2O2 can gently etch the surface, remove the defects and reveal the grain boundaries. To validate this, we removed H2O2 from polishing process when we used colloidal silica. Figure 4 shows the surface finish after polishing without H2O2. Although both α and β phases can be observed, surface pits and deformation is observed both along the grain boundary and also inside the grains. With the addition of H2O2, not only the grains are easier to identify but also less deformation is observed.
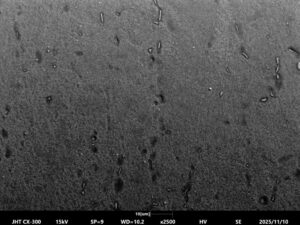 Figure 4: Surface finish without H₂O₂. Pitting and deformation are present; grain boundaries are poorly defined (images taken on Coxem CX300 SEM).
Evaluation of Skipping Intermediate Polishing Steps
Several reference articles also suggested that intermediate polishing steps are not essential, since the additional use of suspension particles can cause further deformation on the surface. We experimented with existing sample prep process skipping the 1um polishing step, going directly from 3um diamond polishing to colloidal silica with H2O2. Sample 5 shows the surface finish of this trial. Although we are able to see the grain boundaries with the use of H2O2, we are not able to remove the relatively deep surface deformation and pits. The deformation created by previous polishing steps cannot be removed with colloidal silica. Comparing the results that we show in Figure 2, it can be concluded that no steps can be skipped for this particular Ti alloy that we worked on.
.
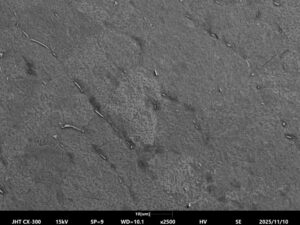 Figure 5: Surface finish when skipping the 1 µm polishing step. Residual deformation remains (images taken on Coxem CX300 SEM).
Ion Milling as an Alternative Final Preparation Step
The last sample preparation trial we did was the use of ion mill. Ion milling is a popular sample preparation technique for EBSD imaging. When we prepare EBSD samples such as steel samples, we usually substitute ion milling for vibratory polishing as the final preparation step. The goal for both techniques is to remove the residual stress on the surface generated by previous polishing steps, and the surface finish with both techniques usually looks very similar. However, for soft metal such as Titanium that is susceptible to heat deformation, ion milling may not be the most appropriate method for final polish. Figure 6 shows the surface of Ti alloy when we extensively ion mill the surface instead of vibratory polishing. This exaggerated experiment shows that ion milling cannot remove the surface defects within the grains, and it also generates heat pockets on the surface. It is recommended to use ion mill for a short period of time to clean up surface oxidation and contamination instead of using as final polishing step.
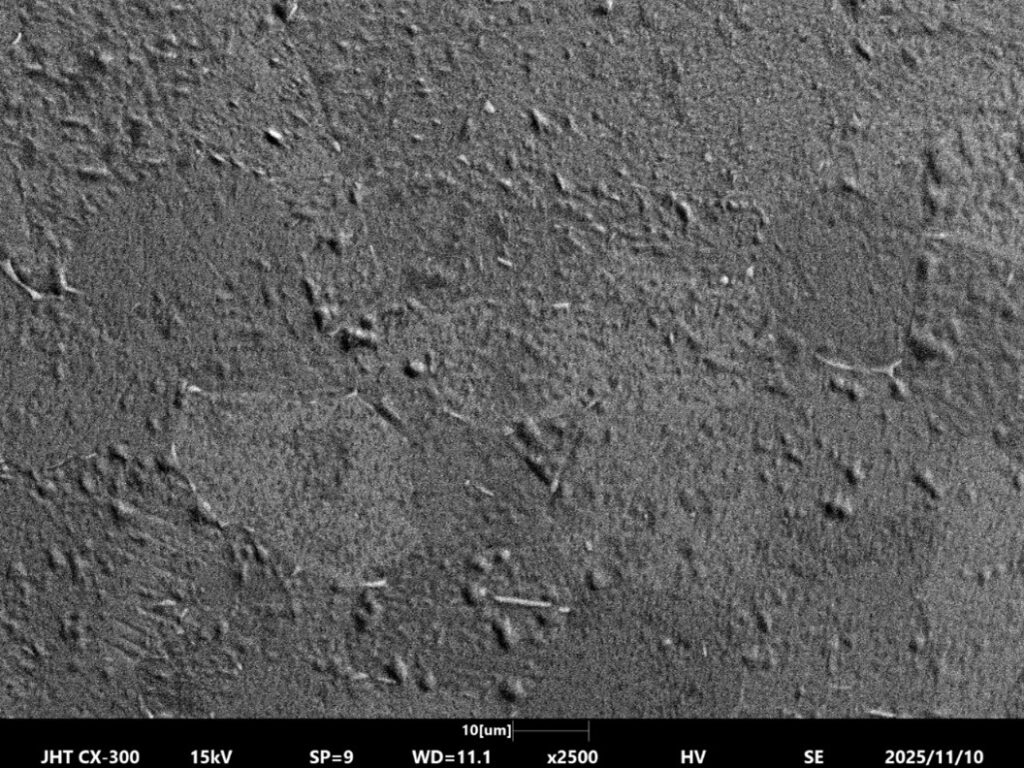 Figure 6: Surface after extensive ion milling. Heat-affected regions and residual defects are observed (images taken on Coxem CX300 SEM).
Summary and Conclusions
A robust and repeatable sample preparation workflow for EBSD analysis of commercial Ti-6Al-4V alloy has been demonstrated. Key findings include:
- Mechanical grinding and polishing alone are insufficient to achieve optimal EBSD performance.
- The addition of hydrogen peroxide during colloidal silica polishing significantly improves surface quality by reducing deformation and enhancing grain boundary definition.
- Intermediate polishing steps are necessary to fully remove subsurface damage in Ti-6-4 alloy.
- Vibratory polishing is strongly recommended as the final preparation step for EBSD.
- Ion milling should be used cautiously and only for short-duration surface cleaning, not as a replacement for vibratory polishing.
This workflow consistently produced smooth, deformation-free surfaces capable of achieving EBSD hit rates above 99%, making it suitable for detailed microstructural and crystallographic analysis of titanium alloys.